


I will introduce how to clone the entire How to clone a hard drive data on the HDD on which Windows is installed to the SSD using the free software “EaseUS Todo Backup Free.”
Backup software “EaseUS Todo Backup Free”

Since system data etc., are operating on the HDD with the C drive where Windows is installed, it is impossible to copy all the data while Windows runs by the standard method.
However, you can create a clone SSD using backup software that can completely copy the entire HDD, including Windows data.
There is some famous backup software, but I would like to create a clone SSD using the free software EaseUS Todo Backup Free.
Below, I will introduce the installation procedure and how to use it by presenting operation images. Still, this article was created in 2016 and is an explanation when using version 9.1 on Windows 7.
The procedure for creating an SSD How to clone a hard drive clone on Windows 10 using the latest version 13 of 2021 is introduced in the following article, so please refer to the following when creating a clone SSD on a Windows 10 computer.
How to install EaseUS Todo Backup: How to clone a hard drive
First, download EaseUS Todo Backup Free 9.1 from the official website. You can also download it from Window Forest or Vector.
Double-click the downloaded “tb_free.exe” to start the setup screen.
In the case of Windows7, the user account control guidance screen like the above image is displayed first, so click “Yes.”
Next, the “Select language to use for setup” screen will be displayed. Make sure that it is in Japanese and click “OK.”
EaseUS Todo Backup has a paid version with great features, but the free version is also good enough to clone. This time we will use the free version, so select “Next.”
This is a display related to the license. Click “Agree” to proceed.
This is the screen to specify the installation destination. Usually, there is no problem with the displayed contents, so click “Next.”
This is the screen for selecting additional tasks. I unchecked both of them this time. Click Next.
This is the screen for selecting the data to save the destination during backup work. This cloning work is not particularly relevant, but you can select the save destination when using the data backup function. Typically, you can leave it as it is, so click “Next.”
The installation will start. After the installation is complete, the above screen will be displayed. Click “Finish.”
This completes the installation work. Next, we will move on to cloning work.
Steps to create a clone SSD
Before starting EaseUS Todo Backup Free that you installed earlier, let’s connect the SSD for cloning in advance.
When installing and connecting as a built-in SSD in a desktop computer, connect it before turning on the computer, when connecting via USB using the USB-connected hard disk case introduced below, it is okay to connect after starting Windows.
Recently, SSDs are much cheaper than before, and 250GB SSDs are in the 4000 yen range, and even 500GB SSDs that can store a lot of data can be purchased for around 7000 yen.
I am very grateful that it has become possible to easily select the introduction of a large-capacity SSD, even for a laptop computer that can only have one SSD built-in.
How to use EaseUS Todo Backup Free
When EaseUS Todo Backup Free starts up, the above license authentication screen will be displayed, but since you will be using the free version, click “Later” to skip it.
This is the main operation screen. Click “Clone” in the upper right to start the cloning process.
Postscript
In version 10 or later, there is an item called “system clone” next to “clone” on the main screen. Still, when I tried it on my own Windows 10 and Windows 7 PCs, respectively, in my case, the system clone. When I used it, both computers failed because the OS could not be adequately started after replacing the SSD.
I think that the MBR (Master Boot Record) How to clone a hard drive introduced below is probably failing because it could not be cloned well. Still, when I selected “Clone” using the same SSD and worked, two PCs Since both were successful, we recommend that you follow the procedure below using the “clone” even when using version 10 or later.
A list of HDDs and SSDs connected to your computer will be displayed. Usually, the C drive has Windows system data.
This time, clone the HDD (hard disk 0) containing the C drive to the SSD (hard disk 2). First, check the hard disk 0 that will be the source (clone source) and click “Next.”
At that time, if you select the round check box in the C drive, the essential data called MBR cannot be copied, and Windows will not be able to boot, so be sure to check the check box next to hard disk 0. Please put it in and clone the entire hard disk.
This MBR (Master Boot Record) is an important thing that is loaded first when you start Windows, and if it is not cloned commonly, Windows will not be able to start, and cloning will fail.
Check the checkbox next to the hard disk (hard disk two this time) to be the target (clone destination).
Important
Make sure that the target (clone destination) hard disk name has (○○ GB, basic, MBR) in parentheses and the MBR notation as well as the source (clone source) disk. If this part is GPT, it means that it is formatted in GPT format, and in this case, cloning will fail with a high probability.
GPT (GUID Partition Table) is a new standard that can replace MBR in a nutshell, but if you want to use this GPT-formatted hard disk as a disk for Windows, you need a UEFI system. Conditions will be required.
When replacing the HDD of an existing computer with an SSD, as in this article, I think that in most cases, it will be a work with a computer that boots with the conventional BIOS, so there is an MBR notation in the above parentheses. Please use an SSD (HDD).
If the one you want to use for cloning is in GPT format, you can use the HDD / SSD case for the USB connection introduced below to select “Computer Management”-“Disk Management” on Windows. You can use it to reformat it to MBR format.
You can buy cheap ones from a few hundred yen, and if you have this, you can reuse the 2.5-inch HDD taken out by SSD replacement with a laptop computer as a portable HDD, so it is convenient to have one. It is recommended at.
Clone Destination
After confirming that the hard disk of the clone destination has the MBR notation, this time it will be cloned to SSD, so check “Optimize for SSD” at the bottom left of the screen and click “Next.”
The capacity and data size of the clone source and clone destination are displayed. If there is no difference with the selected HDD or SSD, click “Run.”
A confirmation screen will be displayed asking, “The data on the target disk will be erased. Do you really want to continue?” Click OK to perform cloning.
The elapsed time, remaining time, and work details during cloning will be displayed, so wait for a while until the completion. This work (data size on the clone source HDD is about 30GB) took about 25 minutes.
As a precaution, when cloning, make sure that the items “Start cloning MBR” and “Clone MBR completed” are displayed.
Very rarely, if there is no MBR in the HDD containing the C drive (for example, if two or more HDDs are connected when Windows is installed, it will be on a different HDD from the one where Windows is installed. An MBR may be created), so make sure that the MBR has been cloned.
When the cloning process is completed, “Disk Clone Completed” will be displayed, and the button at the bottom right will change from Cancel to Complete. Click Finish to finish the process.
This completes the clone SSD creation work. Next, we will finally proceed to the SSD installation work.
Replace with the created clone SSD
Before installing the clone SSD, unplug the power cord from your computer to prevent accidents and malfunctions due to static electricity charging.
HDD and SSD replacement work: How to clone a hard drive
In a desktop computer, the power cord and data cord SATA cord are connected to the HDD, so remove this and replace the HDD with the SSD.
Mounting bracket for 2.5 inch HDD / SSD
Install the SSD in the place where the original HDD was, but in most cases, the HDD of the desktop computer is 3.5 inches in size (about 10 cm in width), How to clone a hard drive while the SSD is 2.5 inches in size (about 7 cm in width), so fix it. In that case, you will need a mounting bracket, as shown in the image above.
However, unlike HDDs, SSDs have no driving parts, so if you rarely move the computer, there is no problem just placing the SSD in a stable location inside the computer (however, when moving the computer, etc.) Care must be taken to prevent the SSD from moving and colliding with other parts).
Recent SSDs often do not have brackets, but in case of emergency, it is better to fix them with brackets.
Check if the clone SSD works fine.
After replacing the SSD, turn on the computer and check if it works.
The work will be completed if it starts up safely, but if you replace the HDD on which Windows was installed, Windows may not start up properly even if there is no problem with the replaced clone SSD.
This happens, for example, when the replaced SSD is not recognized as a boot device for booting Windows.
In such cases, How to clone a hard drive when the computer is started, the characters written in English are displayed on the black screen and do not move, or only the cursor is displayed on the black screen and does not move.
How to set the boot device in the BIOS: How to clone a hard drive
This issue can be resolved by setting the boot device to SSD in the BIOS.
The method of displaying the BIOS differs depending on the manufacturer and model. Still, in many cases. You can display the BIOS by pressing the F2 key or the Delete key. When the manufacturer logo screen appears immediately after turning on the power is displayed.
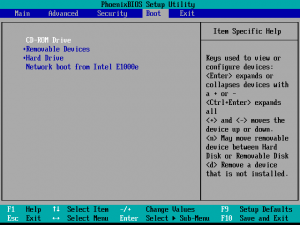
When the BIOS boots, display the boot device setting items. The contents of each item in the BIOS differ depending on the model.
For my computer, there was a boot device setting item in “Advanced Setup.”
the boot device setting item “1st Boot Device” is (Hard Drive). This means that no hard drive has been selected to recognize it as a boot device.
Press the ↓ arrow on your keyboard to select the “1st Boot Device” item and press Enter.
Hard disk device selection
The complex disk device selection screen will be displayed. Select the name of the SSD installed in the 1st Device item and press Enter.
Confirmation of hard disk device registration
After confirming that the SSD name is registered in the 1st Device item, press the ESC key only once to return to the “Advanced Setup” screen.
Completion of boot device registration
If the SSD name is displayed in the “1st Boot Device” item, the change is complete, as shown in the image above. Finally, you can press F10 to save this change and exit the BIOS.
At that time, a confirmation screen such as How to clone a hard drive “SAVE to CMOS and EXIT (Y / N)? (Do you want to save the setting changes and exit the BIOS?).” It May be displayed, so press the Y key to execute. To do.
Immediately after the BIOS is closed, Windows will start booting normally. If the boot device settings are correct, Windows will boot from the SSD.
If the screen remains black again. How to clone a hard drive boot the BIOS again. And check if the SSD name is displayed in the 1st Device item.
When Windows starts up safely, check that you can use your computer as before, such as browsers and emails, and if there are no problems, the SSD replacement work will be completed.
The effect obtained by exchanging HDD to SSD
By replacing the HDD with an SSD. All operations such as starting and shutting down the computer. And starting the browser and Word / Excel have become faster.
For example, before replacing the SSD. It took less than 50 seconds to 1 minute to start the computer. But after replacing the SSD. It took less than 30 seconds, Ux writing resources half the time. And it took about 25 seconds to shut down before the replacement. You can now shut down in just over 10 seconds.
Data transfer speed (left: SSD right: HDD): How to clone a hard drive

When I checked with CrystalDiskMark. Free software that measures the data transfer speed of HDDs and SSDs. I found that both reading and writing are faster in all aspects (the higher the number, the faster the operation).
The standard on the personal computer side is SATA2 (transfer speed is half that of SATA3)
However, the SSD used this time is a model that supports SATA3 and has sequential access reading speed of 500MB / s or more, How to clone a hard drive but since the personal computer side supports up to 300MB / s (3Gbps) in SATA2 standard, as shown in the above image. As the result of the data transfer speed introduced earlier, it was 268MB / s, about half the value.
Compared to the data transfer speed of HDD. SSD is about three times faster for sequential read and about 40 times. Faster for random read. So I was able to experience a sufficient speed increase.
The cost of an SSD replacement this time is less than 5,000 yen. So it can be said that the SSD replacement that. Obtained this result with this amount of money is work with quite a reasonable cost performance.
Also the computer I worked on this time was an old computer seven years ago. But it was a significant achievement that I shortened the time required. For startup and shutdown as fast as the latest computer for only 5,000 yen.
Postscript
We have posted an article introducing the SSD replacement work procedure. And its effect on the 7th generation Core i5 equipped notebook computer How to clone a hard drive “DELL Inspiron 15”. Please refer to this article for the effect of SSD replacement on a PC equipped with the latest CPU and capable of SATA3 connection.
You can also choose to use it as an Android computer
Since the support period for Windows 7 has expired in January 2020, I think that many people are using Windows 7 PCs after upgrading to Windows 10.
By replacing this SSD, you can shorten the time required for startup and shut down with a relatively low budget without having to buy a new computer, so it is a work that is recommended for people who continue to use old computers. Think.
However, this SSD replacement does not improve the primary performance of the personal computer, such as the CPU, but it does increase the read/write speed of the data in the personal computer.
Therefore, it is very effective in shortening the time for starting and shutting down the computer. Still, it occurs when the CPU performance is low, for example, when the CPU utilization rate becomes 100% when opening an Internet site or when Youtube videos are jerky. Often the problem does not improve.
In such a case, you can replace the OS with an Android OS, which operates lighter than Windows, and use it as an Android computer.
Since you can freely use Android apps such as browsers, emails, and games that are the same as smartphones and tablets, you can use your computer more comfortably than if you put up with slow-moving Windows and continue to use it.
The following article introduces how to install Android OS on a Windows PC for free and reuse it.
For business use, consider replacing with a new computer
You can use Office software such as Word and Excel on the Android PC introduced above. But if you are mainly using it for business. I think that using a Windows PC will often improve your work.
Recently laptop computers that are light and have a long battery. Life can be purchased from the 30,000 yen range. And high-performance laptop computers equipped with SSDs. And the latest CPUs as standard equipment. Can also purchase from the 50,000 to 60,000 yen range. How to clone a hard drive As it is becoming more common. I think it may be possible to replace the main PC. With a new model while using the PC on hand as a submachine.
So far we have introduced how to use clone SSD replacement. To make your computer from a few years ago comfortable to use.


