What to consider when drawing a nose
To learn to draw a nose, one should first look at the individual elements of the nose. This gives you a better understanding of how the nose is shaped. With this knowledge, it is much easier to represent a nose realistically.
To a large extent, the shape of the nose is determined by the nasal bone and the nasal cartilage. Nasal cartilage lies roughly in the upper third of the nose and, together with the nasal bone, forms the nasal hump. This nasal hump is decisive whether the nose is straight or a hooked nose – of course, there are also all the steps in between.
In the drawing above, you can see the nasal hump very clearly. This also describes the other elements of a nose.
The second – already mentioned – cartilage that you have to pay attention to when drawing a nose is the tip of the nose. It can also take on very different shapes – round, pointed, wide, thin.
The nostrils are approximately at the same height and about the same size. They are round or spherical and, with their shape, form the nostrils.
When drawing the nose, it is interesting that the nostrils have a narrow oval when viewed from the side. The nostrils are a bit tricky to pull as they can quickly look strange if drawn too big. Incidentally, the nostrils are not generally round either. The nostrils can also have a more angular shape depending on the perspective from which the nose removes.
Draw the side view of a nose step by step
Now let’s move on to the first simple drawing exercise for drawing a nose. The easiest way to mark the nose is from the side.
In the side view, the nose corresponds roughly to a triangle – see picture below. If you want to learn to draw a nose, the first step is to sketch a triangle,
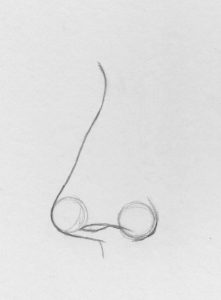
In the next step, you can sketch the tip of the nose and the nostrils by drawing two spheres.
Now give the triangle line, which represents the bridge of the nose, a characteristic contour. This also includes the nasal hump, which barely pronouns in the drawing below. It’s just an example because, as mentioned earlier, noses can look very different. Often the nasal hump is a little more pronounced than in this drawing example.
The nostrils drew in this step. I didn’t draw a closed oval but left the line open.
Draw the frontal view of a nose step by step
Drawing the frontal view – i.e., the view directly from the front – of a nose is a little more complicated. The characteristic shape of the nose is not particularly evident in the frontal view. Therefore, the representation is more complex, especially when the plastic form of the nose makes clear.
If you want to learn to draw a nose step by step, you can start again by pulling the approximate shape. To do this, remove a thin column representing the bridge of the nose and a triangle on each side, which means the sidewall of the nose and the nostrils.
In the second step, you can continue with circles and ovals as a guide. The nose is made up of three processes: a large one that represents the hump of the nose and two small circles that represent the wings of the nose.
In addition, the nose can divide lengthways into three thirds if you need additional help.
In the last step, the nose gets a realistic contour. The tip of the nose draw in, and the nasal septum below it. Here, too, I have shown the nostrils as open circles.
Two arches indicate the nasal hump. The end of the sidewall of the nose is also shown with an arch. You don’t have to draw this curve so clearly because the transition to the cheek is not an edge but somewhat rounded. For practice, however, it is not wrong to remove these arcs so clearly. In the last step, the unnecessary auxiliary lines can also erase.
Also Read: How to caramelise onions