

Do you need to take a photo of your computer desktop but? Being a beginner with the computer world, you don’t know how to do it? Don’t worry. how to print screen You can count on my help this time too. With today’s guide, I will explain how to photograph the PC screen straightforward and fast.
Nowadays, all computer operating systems (and not only) include valid tools to take screen snapshots. Alternatively, various third-party tools are available that allow you to do this by offering interesting additional features. Whether you have a PC with Windows or a Mac, you spoil for choice!
Therefore follow the suggestions I am about to give you. And you will finally discover what needs to done to be able to photograph the desktop. how to print screen Or even a portion of it (for example the window of a single program). In a fast and straightforward way. I wish you a good reading and a lot of fun.
How to take a picture of the PC screen: Windows 10

If your computer is equipped with a Windows 10 operating system, you can easily take screenshots using the Capture and Annotate utility, built into the operating system as standard.
Open the Start menu by clicking on the Windows flag symbol located at the bottom left and click on the Capture and annotate icon; to start the screenshot, click on the New button, visible in the upper left corner of the window that appears. If you wish, How to turn off windows defender you can set a timer of 3 or 10 seconds between selecting the area to be captured and the actual taking of the photo: to do so, click on the down arrow next to the New button and choose the time you prefer.
Now Trace the area of the screen to be captured by holding down the left mouse button. And Having made your selection. Release it to capture the image. If you prefer. how to print screen You can select a different capture mode from the rectangular clip. Using the buttons that appear in the upper toolbar. By clicking on the curved drawing symbol ( freehand capture ), how to print screen you can draw a custom shape; using the button depicting two overlapping rectangles, you can only acquire the active window; again, the button depicting a rectangle with the corners in evidence, instead, allows you to capture a photo of the entire desktop immediately.
Once the acquisition is complete, how to print screen the image will be visible in the integrated editor of the program. You can add annotations, strokes, and other elements, using the buttons visible at the top. To save the file, click on the button depicting a floppy disk located at the top right.
How to photograph the PC screen with a keyboard
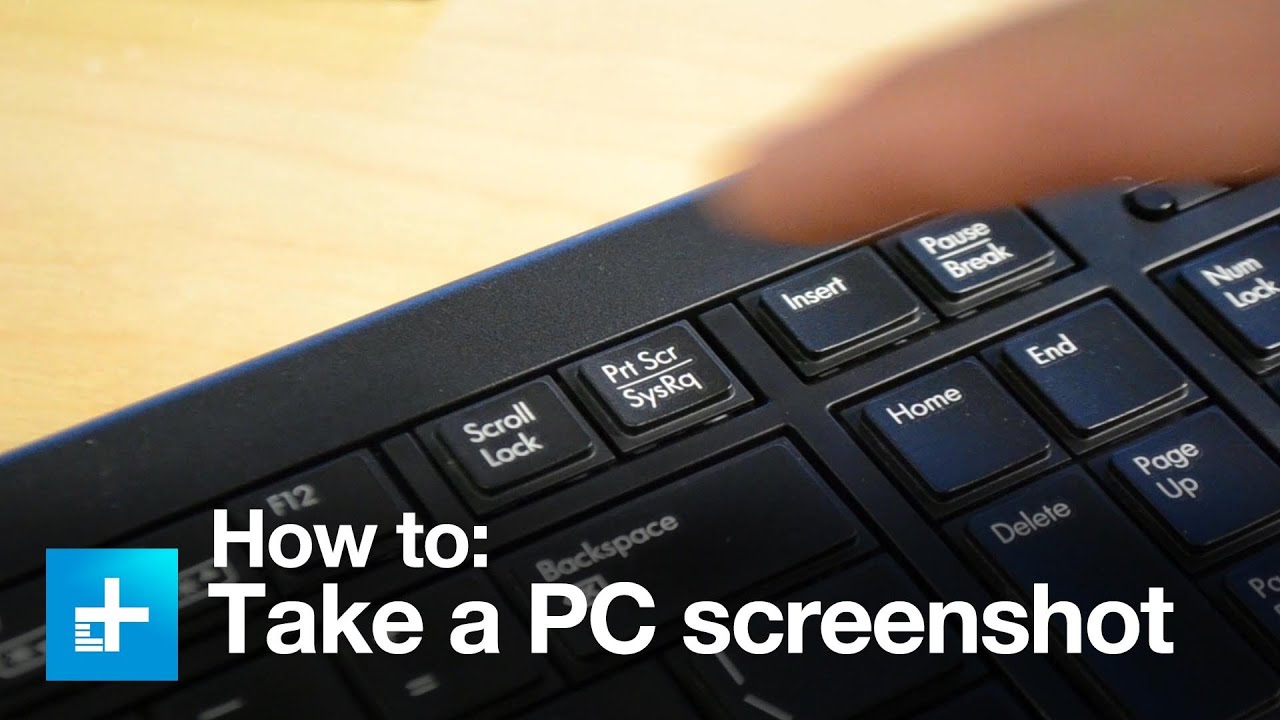
To capture screenshots even faster. You can also use the convenient keyboard shortcuts available in Windows. Almost all require pressing the Stamp key, which on some keyboards is indicated as Print, Prt Scr, Print, or Print. Note that the Print key is located on a multifunction key on some laptops: you may need to press the Fn key along with the Print key in such cases. Anyway, below is a list of the key combinations you can use to take a screenshot quickly.
Tip: Download Photo Editor App Here.
- Stamp: Copies a screenshot of the screen to the Windows clipboard. You can paste it into any graphics program (e.g., Paint) by pressing the key combination Ctrl + V. You can change this behavior by going to the Settings> Accessibility> Keyboard menu and moving the PRINT Link switch to ON
- Alt + Stamp: behaves similarly to what was seen above but only captures the active window.
- Win + Stamp: takes a photo of the entire desktop and saves it directly as a PNG file in the Images> Screenshots folder.
- Win + Alt + Stamp: behaves similarly to what we saw earlier but only captures the active window.
- Shift / Shift + Win + S: call up the Capture and Annotate tool, the same one I told you about in the previous section of this guide. After capturing the screenshot. In this case. The image save automatically: to edit it. Just quickly click on the preview that appears at the bottom correct.
Programs for taking pictures of the screen
As an alternative to the system tools. how to print screen Numerous other programs dedicated explicitly to capturing screenshots allow. You to perform additional operations such as advanced editing of the captured photos. The automation of saving and resizing. group editing. And much more.
- Greenshot: is one of the best programs of this type, capable of acquiring different types of screenshots and editing them “on the fly,” thanks to a powerful integrated editor. It’s free.
- ShareX: it is another software, free and open-source, used to create screenshots of various types. It main dedicated to average expert users. It allows you to fully customize the editor interface. And the methods of acquiring and saving images. Which can also automatically uploaded to the cloud. It’s free.
- FastStone Capture: is a minimal program, which comes in the form of a tiny toolbar always available on the desktop, through which it is possible to capture screenshots of the entire desktop, single windows, or customized screen portions. It’s free.
- GoFullPage: is a free extension for the Google Chrome browser, which allows you to capture the screenshot, in whole or in part, of any browser window without requiring access to advanced privacy permissions (unlike many other similar extensions ). That said, I still advise against acquiring pages that contain sensitive information in terms of privacy.
- Web-capture: This is an online service that performs the same task as GoFullPage, but is compatible with any browser and does not require the installation of add-ons. The recommendation always remains the same: avoid acquiring pages that password-protected or that require personal access.
How to take a picture of the PC screen Mac: How to print screen
The macOS operating system includes an application wholly dedicated to capturing photos (and videos) of the computer, called Screenshot, which resides in the Other folder of the Launchpad (the grid/rocket icon that resides on the Dock ). Alternatively, you can start the program by clicking on the Go> Utility menu (found on the macOS menu bar).
Once the application has started. You should see a small toolbar at the bottom of the screen. To capture the entire screen. Click on the rectangle symbol that resides on the left. To photograph a single window. Click on the selected rectangle instead. To capture a portion of the desk. Instead click on the dashed rectangle symbol.
After selecting the capture mode you prefer, click the Options button to choose whether to include the mouse pointer, set a timer for the screen capture, Best outdoor tv antenna or save the image in a specific location. If you wish, still through the same menu, you can choose whether or not to show the floating thumbnail after acquisition or to remember the last selection made or not.
Apply, if necessary, the appropriate adjustments, click on the Capture button, and, if you have chosen to capture a single portion of the screen, trace it by pressing and holding the left mouse button. To save the image, release this last button.
If you have not changed the default path, the image will be automatically saved on the desktop, in PNG format; to modify it using the Screenshot editor (through which you can draw arrows, lines, texts, cut out portions of the image and so on), click on the thumbnail that appears at the bottom right, immediately after the shot.
How to take a picture of the Mac screen with a keyboard: How to take a screenshot
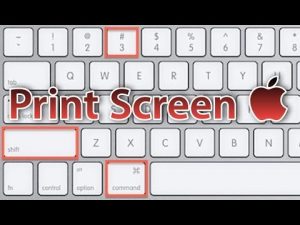
If you prefer, even on macOS, you can use some keyboard shortcuts to speed up screen capture. Here are the most useful ones.
- Cmd + shift + 3: create a screenshot of the screen and save it on the desktop in PNG format.
- Ctrl + Cmd + shift + 3: Take a screenshot of the screen and copy it to the macOS clipboard. Afterward, open the graphics program of your choice and press the combination of keys cmd + v to paste it.
- Cmd + shift + 4: create a snapshot of a portion of the screen (which must be selected with the mouse) and saves it on the desktop in PNG format. To take a screenshot of a window, after pressing the aforementioned key combination, press the space bar and click on the window to be captured.
- Ctrl + Cmd + shift + 4: Take a snapshot of a portion of the screen and copy it to the macOS clipboard. Afterward, open the graphics program of your choice and press the combination of keys cmd + v to paste it.
- cmd + shift + 5 : Open the Screenshot utility.
Other useful options: How to print screen
Finally, it will be helpful to know that macOS also allows you to customize the saving format of each file and enable/disable the shading of individually captured windows. These settings, however, are a bit “hidden” and can only be changed with the help of the Terminal, which you can call up using the menu Go> Utilities of macOS.
To change the screen saving format (the default is PNG), issue the command defaults write com. apple. screen capture type [formato]and press Enter. How to format a hard drive Indica, instead of [formato]the extension you want to use, with a choice of png, jpg, jp2, BMP, tuf, TGA, Pictor pdf(e.g., defaults write com.apple.screen capture type jpgTo use the JPG format).
If, on the other hand, you want to disable the shading of screenshots of single windows (enabled by default). Issue the command defaults write com. apple. Screen capture disable-shadow -bool true and press Enter; in case of second thoughts, use the command instead defaults write com. apple. Screen capture disable-shadow -bool false, to activate it again.
To make the changes effective, restart the SystemUIServer process. Typing the command kill all SystemUIServerin the Terminal, then pressing the Enter key; alternatively, log out of your user account, or restart your Mac.


